How to Upload a File with Divided Chapters, BookRix .com [e textbook reader TXT] 📗
- Author: BookRix .com
Book online «How to Upload a File with Divided Chapters, BookRix .com [e textbook reader TXT] 📗». Author BookRix .com
Many members of BookRix don’t know that uploading a file of your eBook to the site is the easiest and fastest way to publish your book. The file upload option allows you to create divided chapters therefore, automatically creating an interactive table of contents which is required by the external shops. If you are concerned about your formatting, the file upload option keeps your basic formatting intact.
Let’s get started…We will use a Microsoft Word document as our example. Other formats are supported, but keep in mind that PDF documents are not accepted on BookRix. Click here to see why:
http://blog.bookrix.com/2013/04/19/why-ebook-authors-cant-convert-pdfs-to-epubs/
Have your file ready. Basically, write your story. Make sure to write the chapter titles in your document. See example.
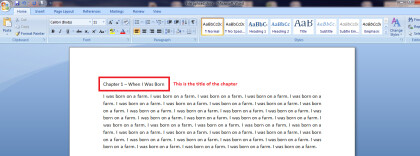
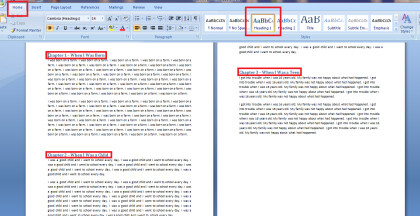
Make sure you are on the “Home” tab in Microsoft word. Highlight only your chapter title and then click on a Heading from the tool bar above. It doesn’t matter what Heading you choose. The standard format will transfer to the epub file of your eBook. See example.

Make sure you do this for each chapter title in your document.
Things to Avoid
*Avoid using different fonts and colors. The BookRix Editor will standardize your text to our default font style and font size. This is because it’s creating an epub file that will be used for various eReaders, which can alter font styles and sizes to what the reader prefers, regardless of the author’s choices.
If you prefer to get fancy with your text, you are limited to bold, italics and underline.
*Avoid inserting information in the header or footer of the document. It will be lost in the upload and can cause formatting issues. I.E. Your name, page numbers, dates, etc.
*Avoid manually clicking “Enter” or “Return” when you want to move text to the next line. The information transferred to the BookRix Editor will think you are starting a new paragraph. This will result in breaks in sentences that will cause your eBook to be rejected from sale.
Only click the “Enter” key when you are starting a new paragraph or when there is new dialogue.
TIP: Always make sure that you have 1 or 2 spaces between paragraphs and dialogue. Not more!
*Avoid clicking extra spaces where they are not necessary. This will result in words appearing where they should not in the epub file.
*Avoid creating a manual table of contents in your book. One is already created for you via the BookRix editor (with the minimum containing the “Cover”, “body of the book”, and the “Imprint”). Books with a manually created table of contents will be flagged by the shops for having double contents and your book will be rejected.
*Avoid adding page numbers to your book. Page numbers are automatically inserted in the epub file. In addition, each eReader has adjustable settings that can be manipulated by the reader, therefore, the number of pages displayed in the eReader is often different than the number of pages in your document.
*Avoid using shop names and direct-to-buy links in your book. These are links that direct your readers to sites for purchase of other eBooks and/or products. Understandably, the stores don't want to see links/shop names that could lead readers to competitor sites in their eBooks.
Basically, keep your document as clean and simple as possible. Avoid anything that isn’t necessary. Some things might make your text look more appealing to the eye, however; they will disrupt the file and cause formatting issues when the epub is created. Remember, you are creating an eBook and not a traditional print book.
TIP: If you ever want to see what your formatting looks like "behind the scenes" so to speak, you can always click on the backwards P looking symbol at the top of the tool bar in Word. This will show you every click that was made on your document so you can make sure that there is no unnecessary formatting that can affect your file.
Uploading Your File
Once your file is good to go, you can upload it to the BookRix editor. When creating a new book, you will open the tab that reads “Edit Book Content”. Here you are given the option to upload a file in one of our supported formats (.doc, .docx, .odt, .rtf.). Click “File Upload” and your file will load into the editor.
TIP: If your file is more than 10MB it may take a while to upload. You may also encounter some loading issues if your internet speed is not fast or if there is high traffic on the site. If you are experiencing a loading issue, try to upload your file at another time. Or if you have a file with a lot of images, causing it to be too large, you may want to remove the images and then upload them directly into the text field from the BookRix editor.
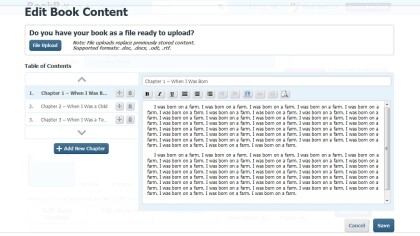
You should now see your file uploaded to the site with the chapters divided. You can add, delete, and edit any chapter you want. You can also upload a new file if you made any changes to your document. Your new uploaded file will override your old one.
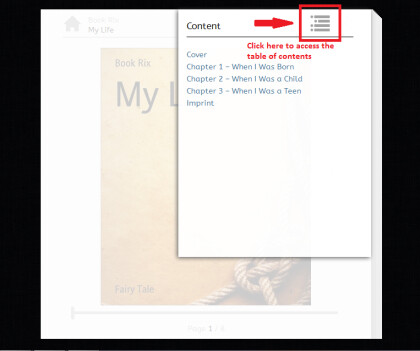
These chapters automatically create a table of contents for your book. You can view this in the BookRix Reader.
If you have any questions or concerns, please feel free to email support at support-en@bookrix.com and we’ll be happy to help.
ImprintPublication Date: 06-07-2013
All Rights Reserved


Comments (0)